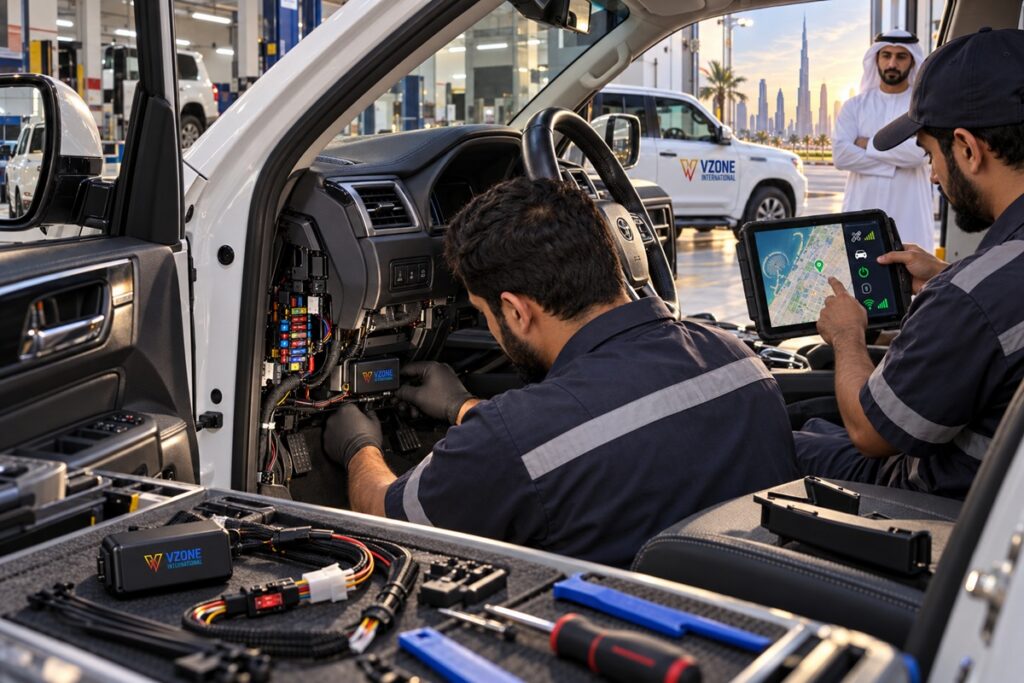
Installing a car GPS tracker takes under 5 minutes for an OBD plug-in device or 30 to 60 minutes for a hardwired device. The method you choose determines how theft-resistant the installation is, whether the device can be easily moved between vehicles, and whether you have access to engine diagnostic data alongside location tracking.
Key Takeaways
- An OBD plug-in tracker installs in under 5 minutes with no tools plug into the OBD-II port under the dashboard and the device powers on immediately from the vehicle’s electrical system.
- A hardwired tracker needs three wire connections: constant power (always live, even ignition off), ground (chassis), and ignition (live only when ignition is on) these three connections are what enable the device to track trips accurately.
- Always test the first trip before considering the installation complete confirm the device is reporting position correctly, that ignition-on and ignition-off events are recording, and that the trip appears in the platform.
Tools and Parts You Need
| Item | OBD Install | Hardwired Install | Where to Get |
| GPS tracker device + SIM activated | Required | Required | GPS provider confirm SIM is active before arriving at the vehicle |
| OBD-II extension cable (optional) | Optional | Not applicable | Auto accessories useful if OBD port is awkwardly positioned |
| Multimeter | Not needed | Recommended | Hardware store for verifying wire voltages before connecting |
| Wire stripper and crimping tool | Not needed | Required | Hardware store or auto accessories |
| Fuse taps (ATO/ATC) | Not needed | Required 2 taps | Auto accessories safest way to tap constant power and ignition circuits |
| Electrical tape or heat shrink tubing | Not needed | Required | Hardware store |
| Trim removal pry tools | Not needed | Recommended | Auto accessories for removing dashboard panels without scratching |
| Cable ties and adhesive mounts | Not needed | Required | Hardware store for securing and concealing the device and wiring |
| Platform login credentials | Required | Required | GPS provider needed to verify device activation before and after install |
Choosing an Installation Location
Installation location determines two things that work against each other: GPS signal quality (the device needs a clear line of sight to the sky behind metal panels or inside the engine bay blocks satellite signal) and concealment from a driver or thief who may want to remove the device. The balance point differs by use case:
- Fleet management priority (driver accountability): a semi-concealed location that discourages casual removal without requiring tools behind the dashboard near the OBD port, under the passenger seat, or in the footwell. Does not need to be invisible, just not obviously accessible.
- Anti-theft priority (vehicle recovery): fully concealed wheel arch lining, behind engine bay trim panels, under the boot lining, or inside a door panel. Requires tool access to remove. GPS signal accuracy may be marginally reduced but remains sufficient for location tracking.
- OBD plug-in devices: position is fixed by the OBD port location. On most UAE-market vehicles the OBD port is under the driver’s side dashboard. If the port is visible and accessible, an OBD device offers no tamper resistance a driver who knows it is there can unplug it in seconds.
| Location | GPS Signal | Concealment | Install Difficulty | UAE Suitability |
| OBD port (plug-in) | Good port is near dashboard edge | Low port is visible | None plug in | Good for leased vehicles, personal use; poor for tamper-resistance |
| Under dashboard (hardwired) | Good near windscreen | Medium behind panels | Low 30 min | Best balance for most fleet deployments |
| Wheel arch lining | Good faces upward toward sky | High requires panel removal to find | Medium 45 min | Best for anti-theft; good signal quality |
| Engine bay | Reduced metal panels block signal | High not searched first by thieves | High heat and vibration require ruggedised device | Only for devices rated to 85°C+ operating temperature |
| Under seat | Good | Medium | Low | Practical for quick hardwired installs; less concealed |
| Boot lining | Reduced (signal travels through glass) | High | Low–medium | Good concealment; device must face upward |
Method 1 OBD Plug-In Installation (Under 5 Minutes)
| 1 | Locate the OBD-II port The OBD-II port is a 16-pin trapezoidal connector located under the driver’s side dashboard on all petrol and diesel vehicles manufactured after 1996. On UAE-market vehicles it is typically within reach of the driver’s left knee. If the port is hard to reach, an OBD extension cable positions the tracker in a more accessible or concealed location. |
| 2 | Verify SIM is activated Before plugging in the device, confirm with the GPS provider that the device’s SIM is activated and that the device IMEI is registered on the platform. An unactivated SIM means the device will power on but not transmit the most common cause of ‘it’s not showing on the map’ calls after installation. |
| 3 | Plug the device into the OBD port Insert the GPS device into the OBD port with the connector facing the port opening. The device draws power from the OBD port immediately. Most OBD trackers will show an LED indicator green or blue typically indicates power and network connection; red or amber typically indicates no signal or no network. Confirm the indicator colour against the device manual. |
| 4 | Open the platform and find the vehicle Log into the GPS tracking platform on a smartphone or laptop. The device should appear on the live map within 2 to 5 minutes of being plugged in the time taken to acquire GPS satellite lock and establish the cellular data connection. If the device does not appear within 10 minutes, check the SIM activation status and the platform login credentials. |
| 5 | Test a short trip Drive the vehicle around the block or through a nearby street for 3 to 5 minutes. Return to the platform and confirm: the trip is recorded, the route matches the actual path driven, the ignition-on event registered when you started the vehicle, and the ignition-off event registered when you stopped. If all four confirm correctly, the OBD installation is complete. |
| ⚠ UAE summer heat note: OBD ports place the GPS device directly below the dashboard in a poorly ventilated position. In UAE summer conditions (June through September), dashboard temperatures can exceed 60°C in direct sun. Confirm your OBD device is rated to operate above 60°C ambient most commercial-grade Teltonika OBD devices are rated to 85°C; cheaper marketplace devices may not be. |
Method 2 Hardwired Installation
Hardwired installation connects the GPS device directly to the vehicle’s electrical system making it tamper-resistant, providing backup battery capability, and enabling features that OBD devices cannot access (like fuel sensor integration). The installation requires three wire connections.
Wiring to Constant Power, Ground, and Ignition
| 1 | Identify the three target wires Use a multimeter to identify: constant power (12V present at all times even with ignition off; typically the red wire in the fuse box), ground (0V, connected to chassis typically a black wire or direct chassis bolt), and ignition (12V only when ignition is in ON or ACC position; typically yellow or orange). On UAE-market Japanese and Korean vehicles, wire colours broadly follow standard conventions; European vehicles vary always verify with a multimeter rather than trusting wire colour alone. |
| 2 | Install fuse taps on constant power and ignition Do not cut the existing vehicle wiring. Instead, insert fuse taps on the constant power fuse and the ignition fuse in the fuse box. A fuse tap adds a second fuse position alongside the original, drawing from the same circuit without interrupting it. Use fuse taps rated to the correct amperage check the GPS device’s power draw specification (typically 100–500 mA) and use a fuse rated at 1A to protect the device circuit. |
| 3 | Connect device wires to fuse taps and ground Connect the GPS device’s power wire to the constant power fuse tap output, the device’s ignition wire to the ignition fuse tap output, and the device’s ground wire to a clean chassis ground bolt. Secure all connections with crimped connectors covered with heat shrink tubing or electrical tape soldered joints are more reliable than crimp connectors in UAE heat and vibration conditions if you have the tools, but crimped connectors are adequate for most fleet deployments. |
| 4 | Route the device to its installation location Cable-tie the device and its wiring neatly behind dashboard panels, along existing wiring looms, and out of sight. The GPS antenna (if external) must face upward toward the sky — mount it on the dashboard near the windscreen or on the underside of a roof panel for good satellite signal. Secure the device body with adhesive mounts rated for high-temperature UAE conditions standard foam tape degrades in UAE summer heat and allows the device to work loose. |
| 5 | Verify ignition and constant power wiring Before reassembling panels: turn ignition on the device should show ignition-on LED or transmit an ignition event to the platform. Turn ignition off the device should switch to sleep mode (reduced power draw) but remain on constant power for trip completion recording and tamper detection. A device that loses all power when ignition is off is incorrectly wired to the ignition circuit rather than constant power on the main wire. |
Fuse Tap Safety
Fuse taps are the safest way to add a powered circuit to a vehicle without cutting original wiring. Two safety rules that apply specifically to UAE operating conditions:
- Always use the correct fuse rating for the GPS device circuit do not insert a higher-amperage fuse than specified. In UAE summer heat, electrical systems already run warmer than temperate-climate design assumptions; an overrated fuse will not protect the circuit if the GPS device develops a fault.
- Do not tap a fuse that is already close to its rated load in a fully loaded commercial vehicle electrical system, adding a GPS device to an already-stressed circuit increases failure risk. Find a lightly loaded circuit or add a dedicated fused spur from the battery positive for clean power.
Concealment and Anti-Tamper Placement
For fleet deployments where driver tamper resistance matters, the installation location and wiring concealment determine how quickly a determined driver can find and disable the device. Three concealment levels:
- Level 1 deterrence only: device installed under dashboard behind an easily removed panel; visible to someone who looks, but not immediately obvious to a casual glance. Sufficient to deter opportunistic removal; insufficient against a determined driver who knows tracking is active.
- Level 2 practical tamper resistance: device installed in the wheel arch lining or behind a non-obvious interior panel requiring tools to access. Most drivers will not search here; even if they know a tracker is installed, finding it requires 15 to 30 minutes of panel removal. Appropriate for most UAE commercial fleet deployments.
- Level 3 anti-theft concealment: device installed behind an engine bay panel, inside a door pillar, or in the boot lining multiple panels deep. Designed for vehicle recovery after theft, not driver accountability. The thief’s first action (cutting vehicle power) activates the backup battery; the second action (searching for the tracker) is unlikely to succeed in a Level 3 installation before the vehicle is recovered from the GPS position.
Activating the SIM and Pairing the Platform
Most commercial GPS providers pre-activate the SIM and pre-register the device IMEI on the platform before shipping the device transmits from the moment it receives power, without requiring any in-vehicle configuration. Confirm with your provider whether the device is pre-activated or whether SIM activation must be performed after installation.
If SIM activation is required post-installation: the GPS provider typically provides an activation portal or contact number. SIM activation for a UAE GPS device on Etisalat or du takes 2 to 4 hours after the activation request do not install the device, discover it is not transmitting, and assume the installation is faulty before the SIM activation window has elapsed.
Testing Your First Trip
A GPS installation is not complete until the first trip is verified. After installation, perform this verification sequence:
- With the vehicle stationary and ignition off, confirm the device appears on the platform live map at the correct location.
- Start the ignition confirm the platform registers an ignition-on event within 60 seconds.
- Drive a 3 to 5 minute test route a route with at least one turn, so the GPS trace can be confirmed against the actual path driven.
- Stop the vehicle and turn off ignition confirm the platform registers an ignition-off event and the trip record closes.
- Review the completed trip in the platform confirm the route trace matches the actual path driven, the start and end times are accurate, and the distance recorded matches the vehicle odometer reading for the trip.
| ⚠ If the GPS trace shows the vehicle stationary or in the wrong location, the GPS antenna may be obstructed by metal panels blocking satellite signal. Relocate the device or external antenna to a position with better sky view before completing the installation. |
When to Use a Professional Installer
Professional installation by a certified technician is the right choice in five situations:
- Commercial fleet deployment: vehicles under a UAE fleet compliance programme (Asateel, ADNOC IVMS, SecurePath) must use an approved GPS device installed correctly improper installation that causes intermittent data transmission triggers compliance gaps and regulatory notices. A certified installer guarantees the installation meets compliance requirements.
- Fuel sensor integration: calibrated fuel level sensors require installation inside the vehicle’s fuel tank a specialist fuel system intervention that requires drained tanks, certified equipment, and sensor calibration against the specific tank geometry. This is not a DIY task in any operating environment.
- Manufacturer warranty concerns: hardwired installation that modifies vehicle electrical circuits may affect the manufacturer warranty on UAE-market vehicles still under warranty. A professional installation from a certified technician, documented with a service receipt, provides evidence that the modification was performed to a professional standard.
- High-concealment anti-theft requirements: wheel arch lining, door pillar, and engine bay installations require panel removal, high-temperature adhesive application, and routing through factory cable management systems work that requires automotive workshop access and experience.
- UAE summer heat conditions: GPS devices installed in poorly ventilated positions in UAE summer (ambient above 45°C) run at device operating temperature limits. A certified installer knows which locations in each vehicle model create heat risk and which provide adequate ventilation reducing the risk of early device failure from thermal stress.
Conclusion
A GPS tracker installation is only as good as the first trip verification the installation is not complete until the device is confirmed reporting correctly on the platform with accurate ignition events, trip records, and position data. A bad installation incorrect wiring to the ignition circuit, poor GPS antenna placement, an unactivated SIM, or a device mounted in a position that blocks satellite signal is functionally worse than no installation, because it creates false confidence that the vehicle is being tracked when it is not.
For OBD plug-in devices, the 5-minute installation and 5-minute verification are entirely manageable without professional help for most users. For hardwired fleet deployments particularly those involving UAE compliance programmes, fuel sensor integration, or high-concealment anti-theft requirements professional installation by a Teltonika-certified technician is the reliable path to an installation that works correctly from day one. VZone International provides professional GPS tracker installation across the UAE fleet batch scheduling minimises vehicle downtime. Contact our team for an installation quote for your vehicle count and device specification.
VZone International Professional GPS Tracker Installation UAE-Wide, Teltonika Certified
VZone International provides professional GPS tracker installation across the UAE Teltonika-certified technicians, UAE compliance installation for Asateel, ADNOC IVMS, and SecurePath, fuel sensor calibration, fleet batch scheduling, and 12-month installation warranty. Contact our team for an installation quote and scheduling for your vehicle count and location.
Frequently Asked Questions
A car GPS tracker is installed by one of two methods. OBD plug-in installation: locate the OBD-II port under the driver's side dashboard (standard on all petrol and diesel vehicles made after 1996), confirm the device SIM is activated, plug the tracker into the port, and verify the device appears on the tracking platform within 5 minutes the entire process takes under 5 minutes with no tools. Hardwired installation: connect the device's power wire to the vehicle's constant power circuit via a fuse tap, the ground wire to a chassis ground point, and the ignition wire to the ignition circuit via a fuse tap then route and conceal the device at the chosen location. After either installation, drive a test trip and verify the route, ignition events, and distance appear correctly on the platform before considering the installation complete.
The best hiding location for a GPS tracker depends on the priority anti-theft concealment or signal quality. For anti-theft: the wheel arch lining (facing upward for good GPS signal, accessed through the wheel arch without entering the vehicle), inside a door pillar (high concealment, GPS signal adequate through fibreglass panels), or under the boot lining. For fleet management where concealment from drivers is needed but recovery-grade hiding is not: under the dashboard behind the fuse box panel, or under the driver's seat mounted facing upward. Avoid placing the device behind metal panels (engine bay sheet metal, metal roof panels, or metal door skins) metal blocks GPS satellite signal and will prevent accurate location tracking.
Yes an OBD plug-in GPS tracker can be self-installed in under 5 minutes with no tools by any vehicle owner. A hardwired GPS tracker can also be self-installed with basic automotive electrical knowledge a multimeter to identify the correct wires, fuse taps to add circuits without cutting original wiring, and crimping tools for wire connections. However, professional installation is recommended for: UAE compliance deployments (Asateel, ADNOC IVMS, SecurePath) where installation quality affects compliance data transmission; fuel sensor installations that require fuel tank access; manufacturer-warrantied vehicles where electrical modifications should be professionally documented; and high-concealment anti-theft installations in wheel arch or engine bay locations.
Installing a GPS tracker does not automatically void a car warranty in the UAE, but modifying vehicle electrical circuits without professional documentation may give a dealer grounds to reject warranty claims on components affected by the modification. The safest approach for UAE-market vehicles still under manufacturer warranty: use an OBD plug-in device (no electrical modification, fully reversible), or use a professional certified installer for hardwired devices (documented installation receipt shows the work was performed to a professional standard). Fuel sensor installation which requires fuel system access should always be performed by a certified technician regardless of warranty status, as it involves specialist equipment and calibration that go beyond basic electrical installation.
GPS tracker installation takes under 5 minutes for an OBD plug-in device locate the OBD port, confirm SIM activation, plug in the device, and verify the first trip. Hardwired installation takes 30 to 60 minutes per vehicle for a standard under-dashboard installation by an experienced technician longer for high-concealment locations (wheel arch: 45 to 75 minutes), fuel sensor installations (2 to 3 hours including tank drain, sensor installation, and calibration), or vehicles with complex panel removal required for the chosen installation location. For fleet batch installations, a single certified technician can typically complete 5 to 8 standard hardwired installations per day; two technicians working simultaneously can install a 20-vehicle fleet in 2 to 3 days with no vehicle out of service for more than a few hours.